Recently I was working on getting CiviCRM to work with external API access, because I have a multi-site install which needs to be able to communitcate with the contact database across all of the sub-sites without having the plugin turned on (for reasons I'll explain in a moment). Now, API v3 does look like it is a great improvement over v2, however, it has been less-than-documented, and important information is scattered in various locations. I'll try to summarise what I've learned here to illustrate how to get an external API up and running.
Issue #1
The first problem I ran into was the external API script was having trouble finding the civicrm.settings.php file, which is located in /root/sites/default/. The reason this issue occurs is because I have added my civicrm module files to /root/modules/civicrm, instead of /root/sites/all/modules/civicrm/ where it was expecting to be. There's a patch out there that should fix the issue, but you can also get around it by adding a DEFINE('CIVICRM_CONFDIR', '/root/sites/default/'); somewhere in the include path.
Issue #2
The v3 documentation is not very clear about pointing this out, but there are 2 api tokens which you need to get CiviCRM's API to work externally. The first is the 'key' variable, and it is generated when you run the CiviCRM install script when you first install it. It's located in your civicrm.settings.php file as a defined constant. Do a search for 'KEY' and you'll see it. The second is the api_key, which is a bit harder to get at if you don't know where it's coming from. Turns out, it is generated for you each time you start an API session. You log in with a Drupal user who has the appropriate permissions to access the CiviCRM features you're needing to query, using a username and password. This works basically like HTTP basic auth, so watch out if you're doing this locally and not posting to https. (Civicrm's API explorer also generates everything for you as a GET request, so, careful of that as well). However, it'd be too easy if you just logged in with the Drupal user, which leads me to...
Issue #3
The user you are logging in with needs an api_key in the civicrm_contacts table of your CiviCRM database. There does not appear to be a way to generate this via the interface, so you have to go into the database, generate an api key, and drop it in the civicrm_contacts table for the appropriate contact which is tied to the Drupal user you are wanting to use. There may be an extension out there that makes this easier, but I was unable to locate one quickly enough while I was working on my other API issues, so I just manually inserted it.
Now everything seems to be up and running, but it was a bit more of a hassle than I was anticipating. However, I did mention one other problem that I ran into while I was using the api, and the reason I can't use the PHP interface to interact with it directly.
Api/api.php doesn't function if the module is not enabled
I believe this is because the module's autoloader doesn't get called if the module is not enabled on the site you're attempting to interact with it, and could potentially be solved by manually including some files (and this is mentioned on their API docuementation, under a standalone-Joomla! install), which I'll be investigating later. Why don't I just enable the module and be done with it? The issue here is I need to read from the CiviCRM contacts list to ensure some things are there, but I do not want to write to it when a user registers. The CiviCRM module by default implements hook_form_alter and adds the default CiviCRM contact information to the login form, and adds its own form validator and hook_user_presave, which I don't presently want running.
All in all CiviCRM is going to make my life easier, but I really wish the API v3 documentation were fleshed out a bit more, or at least easier to navigate. (Presently you only have the API explorer, which is handy if you know what you're looking for, but not so much if you don't.)
A very brief continuation of my CiviCRM API exploration from the other day.
I have gotten everything up and running, but there are a few more things which one needs to be aware of when querying against the search API.
Custom Fields
You can query against custom fields which you've defined for your CiviCRM contacts, but you have to query them with the name custom_{id} where ID appears to be an auto incrementing key, that you will either need to look up in the database, or querying against the CustomField api, which will allow you to figure out what the appropriate ID is.
Changing the number of records returned
As far as I can tell, this isn't documented anywhere, but the variable you want to pass is rowCount. This is useful when you want to get all your custom fields, as the default rowCount is 25.
Searching on multiple fields defaults to an OR relationship
Or, as near as I can tell. So, basically if you're wanting to query against first_name and last_name, it will give you records that match either of the fields. I'm not presently aware of how to change that behavior.
I've recently been evaluating different website benchmarking tools, so I though I would take a moment to highlight two of them I have used recently.
ab
ab is the Apache Benchmark tool, and it comes bundled with Apache. It's a pretty simple cli tool, used to test the throughput of a website. It has a bunch of different options you can pass to it, but the most important are -c (number of concurrent connections) and -n (number of requests). It's man page is pretty well written, so I'll let you explore the other options on your own.
(Make a note here, that you need to specify the protocol, and the page, otherwise ab will complain)
And the results of that benchmark:
ab -n200-c20 http://alextheward.com/ This is ApacheBench, Version 2.3<$Revision:655654 $> Copyright 1996 Adam Twiss, Zeus Technology Ltd, http://www.zeustech.net/ Licensed to The Apache Software Foundation, http://www.apache.org/
Server Software: Apache/2.2.22 Server Hostname: alextheward.com Server Port: 80
Document Path: / Document Length: 19858 bytes
Concurrency Level: 20 Time taken for tests: 26.306 seconds Complete requests: 200 Failed requests: 0 Write errors: 0 Total transferred: 4076928 bytes HTML transferred: 3986634 bytes Requests per second: 7.60[#/sec] (mean) Time per request: 2630.642[ms](mean) Time per request: 131.532[ms](mean, across all concurrent requests) Transfer rate: 151.35[Kbytes/sec] received
Connection Times (ms) min mean[+/-sd] median max Connect: 6921211728.415549394 Processing: 0296372.51482138 Waiting: 063166.30897 Total: 33124171776.018469684
Percentage of the requests served within a certain time(ms) 50% 1846 66% 2623 75% 3189 80% 3586 90% 4958 95% 6051 98% 8059 99% 8518 100% 9684(longest request)
Looks like I could be doing a better job serving up web requests! Lowering the concurrency certainly helped the test, getting the request time down to < 1000 ms for 90% of requests, so I need to see what's going on with Apache when I'm serving up concurrent requests.
There's another gotcha with AB. It cannot handle ssl requests coming from a server with a self-signed cert. There does not appear to be any way to tell it to ignore ssl errors either.
Apache Jmeter
Jmeter is actually really cool, but it does have a bit of a learning curve. I've attached a couple of images which show a basic configuration.
First thing you have to add is a thread group. This is the place where you tell it how many threads to run on, and how many requests each thread is going to request. After that, you need to add HTTP Request defaults, so that you can specify the default server and the default request uri. Next, you add a HTTP Request sampler, and give it the uri you want to test. You can add as many of these as you want. Finally, you need something to read the results. I've added 2, one which shows the sample results, and another which shows the average request times over an interval.
After you hit the run button, you will see results in the resulting screen!
It will give you a pretty good intro to how to do web benchmarking with it. There are a bunch of other features which are outside of the scope of this post, but it's a pretty good tool for doing all kinds of performance testing.
My last post was about using ab and jmeter to get some performance benchmarks on a website. Now, I figure I should probably mention how to profile your application to look for memory leaks, bad calls, and what portion of the code is taking the most amount of time.
First thing to do is get xdebug installed. There are several ways to go about this, the easiest being using a package manager to do the hard work for you. For example, if you're running Ubuntu with the default php from apt-get, you would do:
sudo apt-get install php5-xdebug
Failing that, the xdebug site has a full set of instructions on how to install and configure it: http://xdebug.org/docs/install
Okay! Now that it's installed (and presumably working), jump into php.ini (usually going to be in /etc/php.ini on linux systems, I hear it's in /usr/local/etc on freeBSD for example).
There are a couple of configuration settings you can set in order to turn on profiling. Here are how they work (and they're all listed here as well: http://xdebug.org/docs/profiler):
xdebug.profiler_enable=1 - This will turn on profiling for all requests, which is not a great idea as it will generate a lot of cachegrind files quickly.
xdebug.profiler_enable_trigger=1 - This turns on profiling if XDEBUG_PROFILE=1 is present in the GET/POST, or if you have a cookie set with that name (content doesn't matter)
xdebug.profiler_output_dir=/tmp - Sets the profiler's output directory!
So, you usually want to turn on profiler_enable_trigger, and then pick out a page you want to profile (maybe one that is fairly slow) and then add ?XDEBUG_PROFILE=1 to the end of the url. Go check the directory you set in profiler_output_dir, and check out the cachegrind files it generated.
What the heck do you do with cachegrind files?
If you're on Windows, you'll want to dig out wincachegrind. On Linux, kcachegrind. On Mac, I've tried out MacCallGrind, it's a paid app, but the trial allows you to open files up to 3MB in size (which will generally be enough on smaller page loads, but if you have a serious call stack problem it won't cut it).
So, fire up the cachegrind parser of choice and load up a cachegrind.out file of your choosing. You will be presented with a window that looks like this (WinCacheGrind).
Learning to read the output isn't too difficult, the left side of the window is the entire call stack, starting at the outermost call and allowing you to drill down into all of the subsequent calls. You can also do that on the main panel. The different columns of the main window are the amounts of time each call took to execute. Self is the total amount of time that particular invocation took. In the sceenshot my main file (but nothing it included) took 1ms. The Cum. column is the cumulative amount of time that all of the child calls inside of the main method took (aka 22 seconds).
Just stepping through the entire application can be useful, but more useful is being able to sort through the most expensive calls that are happening in your application. Simply click on the Overall tab, and you will be presented with a screen like the following.
As you can see, there are several more columns which provide you with more information. Avg. Self is the average amount of time that individual call took across all of the invocations. **Avg. Cum. **is the average amount of time that the call took including all of the child calls that method invoked. Total Self is the total amount of time the individual call took across all invocations. **Total Cum. **not surprisingly is the total amount of time the call including child calls took. Calls is the total number of times that method was called during script execution.
That Total Cum. column is the one you will want to look at in order to determine where large spikes of time are being used up. As you can see, I've sorted on that field, and php's call_user_func_array is taking the largest amount of time. That's not particularly useful, though you can then drill down into the call stack and get to the meat of the problem by doubleclicking (from the line-by-line section) until you find a more concrete problem. How do I know it's not actually call_user_func_array's fault? For one, Total Self is 18ms, which is almost nothing. For two, it doesn't do anything except make another call.
Drilling down, I find that ultimately the longest call is split between view->build and view-render, indicating I have a problem with a drupal view I'm inculding on a bunch of pages. Going even deeper, the majority of the time in those calls are also because of a mysql call, indicating a query problem being the bottleneck.
Optimizing Mysql is beyond the scope of this article, but it is next in my series of site optimization articles so stay tuned!
Yesterday, during a conversation with my coworkers on how Dependency Injection works with the Service Locator pattern, we were talking through what would happen with cyclical dependencies. Basically, what would happen if you told a Service locator to load a dependency for one class, and that class had a dependency for the class that was originally calling the Service Locator. This would cause an infinite loop, and in PHP, Maximum Memory Exceeded error pretty rapidly.
Class A attempts to resolve a dependency for class B, class B then tries to get a dependency for class A, and so on. There is a way to avoid this, turns out, if you're willing to make some concessions.
This is where my PsySl comes into play. It is basically a small experiment to see if I could deal with the cyclical dependency loop. Here's the meat of ServiceLocator class:
There's a lot going on in this method. First, it checks to see if it has any open dependencies (things that have called the resolution stack but have yet to be completely resolved). If it does, it creates a new StubResolver and sets the dependency it is a mock for. Next, it checks the stack trace to see if the calling class is one of the things it is registered to resolve (and really, it should probably check to see if it is the construct method, since otherwise it wouldn't cause a loop). If this is the case, it appends it to the list of open dependencies and continues on. The last bit is it tries to resolve the original dependency it was trying to resolve, closes its open dependency, and continues along. Additionally it keeps a copy of the dependency it created in a static variable so it StubResolver can later resolve its dependency without entering an infinite loop. (Which consequently means the dependencies have to be singletons, a problem I'm not sure if it is possible to get around).
That's about where the magic happens. In our new A($sl) example, A tries to get a copy of B, and in the process registers A as an open dependency. B then tries to resolve A, and is returned a StubResolver instance for its "A" dependency. B finishes resolving, and everyone is happy.
But wait, now B has a StubResolver in place of its $a parameter. How does it fully resolve to A? Well, StubResolver has a magic __call method which does the following:
So, as you can see, there is a lazy load of the dependency the first time you call a method on it. You would need to implement __get and __set which will also do the same, and forward those along to the dependency as well.
All of this is incredibly impractical and breaks all kinds of conventions, but it was a fun exercise to dig a bit into the associated patterns and how php can be manipulated for evil (or good). You can view the full source over here: https://github.com/cthos/PsySl
Just a very quick note, as I had to do a bit of hunting to find where the heck Aegir was generating my virtualhosts for all of the domains I was managing through it.
By default it is located in /var/aegir/config/server_master/apache/vhost.d/, where that server_master part might change depending on what host you're modifying (if you're in a complex hosting situation, for example).
This comes in handy if you want to install SSL certificates yourself instead of going through Aegir to handle the certificates.
So, I was working on getting a particular view which rattles off a list of categories working to link off to another view that has a Contextual Filter on said category field to list off all matching content items with said value in the field. Similar to Taxonomy terms, but being linked from a select dropdown. I was using the output as link option, with a replacement filter to put the value of the item into the url. Everything was pretty straightforward, except for one little snag. One of my categories had a forward slash in it. Now, normally I would think this / would be url encoded to %2F, but that wasn't happening.
I did some digging, by utilizing hook_views_pre_render to modify what it was sending to the display, and I found that it was in fact running through drupal_encode_path. Here's the full text of that method:
returnstr_replace('%2F','/',rawurlencode($path));
As you can see, that's just urlencoding the string you're sending to it, and then decoding the slash. That means that no matter what I do in hook_views_pre_render, I am totally unable to get that / encoded properly for the url. Bummer.
Eventually I hacked it by making a separate view for the offending item (there was ony one), but for now it looks like my best option is to not allow slashes in that particular drop-down.
I recently decided to get an IRC server up and running to see how complicated it would be compared to installing ejabberd.
After looking through some of the packages available on Ubuntu through the standard repositories. I wanted to have Nickserv and Chanserv running, so I was hoping to get something with services included. Originally, I tried ircd2, but I didn't find a decent services package which worked with it. So then I was going to try dancer-ircd, because it had a dancer-services package. Turns out dancer-services was removed from the package repos due to a bug that was never corrected.
Thus, after a bit of poking I decided to go with ircd-ratbox and ratbox-services.
Installing Ratbox
Ratbox is pretty easy to install, and it has a very large (and very snarky) sample configuration file for you to work off of. It recommends that you read the entire thing first before starting to configure your real ircd.conf file. It then forces the point because there's a configuration variable which will shut down the server if you haven't been reading the entire thing (I'll give you a hint. It's called "havent_read_conf", and it's in the general block). Okay, fine. After a lot of head banging and some finagling I manage to get ircd-ratbox functional. That is all well and good, but unfortunately getting ratbox-services functional was a different story.
Wrestling with ratbox-services
First thing you need to do is get a back end for ratbox-services to run off of. I originally went with the sqlite backend, but there was a problem I was unable to resolve where it was unable to write to the db file. So then I switched to mysql. The problem there was the mysql db isn't installed by anything, so I had to go hunting for the mysql configuration file. It was not in an intuitive place (/usr/share/ratbox-services/lib/schema-mysql.sql).
The other undocumented problem was that NickServ is disabled by default (why? Why was that turned off?).
All in all it was not super difficult to get running after a careful reading of the configuration files, there were some gotchas which took me quite a long time to get figured out.
Today while I was talking in #techlahoma, the topic of chatbots came up. Being something of a chat bot connoisseur, I (with @amandaharlin's blessing) have set out to tell you how to get your very own hubot up and running on IRC.
First, let's talk briefly about my chat bot history. I've written a Python chat bot from scratch to connect with an XMPP server. His name was kittenbot, and he was awesome. As a result, I got very familiar with XMPP's XEP-0045, which is the specification for multi user chat. Fortunately, the good folks over at @github have given us a lot more to work with than I did in the Kittenbot days.
Awesome. So let's get cracking.
First thing you should do is go grab an ice-cold beer. I've gone with Prarie Wine Barrel Noir. It's particularly delicious and well suited to making hubots.
The second thing you need to do is install the latest version of node. I've built it from source on ubuntu, which is an amazingly simple process. Instructions can be found over at Joyent.
You need then to get the required npm packages for hubot:
npminstall-g hubot coffee-script
After you have that installed, you'll need to create your new hubot. This is done simply with:
hubot --create techlahoma-bot
This will create a new techlahoma-bot directory in whatever root directory you specified. I'll be putting this code up athttps://github.com/cthos/techlahoma-bot. Next step is to install the new hubot's brain! This runs on redis by default, which is fine. I'm not going to be super picky and just install the redis-server package provided by my host. Once that's installed, it is running on the proper port by default, so that's all we need to do.
After that, we need to make some minor modifications to the Package.json file. For some reason, the one generated by hubot --create does not include the correct version for hubot-scripts. We need to change the line:
'hubot-scripts':'>= 3.5.0 < 3.0.0',
To
'hubot-scripts':'2.5.14',
Great! Now hubot is able to actually run. Now we need to pick and choose some awesome things from the Hubot Script Catalog to have our bot be capable of by editing hubot-scripts.json:
So it has been a while since I first talked about creating amandaharlin_v2, and I figured it was time for an update.I originally spun up _v2 on Digital Ocean (which is what is hosting this blog), and everything worked out pretty well.
However, this left some things to be desired, as I was the only one in control of the server, and since I wasn't using any kind of node process manager. If irc would disconnect for extended periods of time, or the node process would die for any reason, I'd have to manually go restart the bot. Additionally, there wasn't an easy way to give access to the administrators of #techlahoma.
This is why I receently moved amandaharlin_v2 over to Heroku. The instructions for this are actually very well documented, and the process is not all that difficult.
The very first thing that you need to do is create the heroku app, which can be done with the heroku command line:
cd techlahoma-bot
heroku create
This automatically adds the heroku git repo url to the git repository within which the command was run.
After that, it's just a matter of using heroku:set to create the appropriate environment variables:
That last one is used to ensure the application pings itself at the appropriate interval to ensure that it doesn't timeout when inactive.
Finally, the only last thing you need to do when pushing the bot is to update the Procfile in order to actually start the app:
web: bin/hubot -a irc -n amandaharlin_v2
After that, we're done! Huzzah.
The added bonus here is that I can also grant access to the various #techlahoma leadership to adminster the app directly instead of having to create ssh accounts for them.
I had a bit of free time this afternoon, and decided I should take a moment to talk about one of my favorite things: Markdown. In the post, I'd like to talk about what I've been using Markdown for and a few of the services and tools I've been looking at and using. Hopefully it'll be useful!
Let's get this disclaimer out of the way up front. I <3 Markdown. I use it to write basically everything (this post brought to you by the Markdown Module ). It's not for everyone, and for publishing it's not going to replace Publisher or Pages anytime soon, especially for things with highly complex layouts.
Since we've established that Markdown is awesome (for me), it follows that getting to write things in Markdown is also essential. Even more so when you can do things like write standard reports, books, and anything else that could potentially be published in Markdown.
Thus, recently I've been working with Gitbook - a publishing platform and node package which can convert structured Markdown files into a book, which is styled according to the default gitbook css. At Acquia, my team has also been doing a fair amount of work with using GitBook's open source node module to write reports in.
I have to say that GitBook is a pleasure to work with. I find myself spending less time having to deal with formatting quirks, and more time proofreading and writing the things I want to produce.
With GitBook, the way it wants you to structure your book makes it pretty intuitive to keep the file structure well aligned with the structure of your outline.
At minimum, you need a README.md and a summary.md. The summary file contains the outline of your book, chapters, subchapters, etc. This can then be used to automatically generate folders for your book to go into using the gitbook init command. Double fun, because it's smart enough to not overwrite files that already exist, so you can use it to stub out files for you while you're working.
The README serves as the summary file for the book, and appears at the front as an introduction. Both of these files are configurable by editing the book.json file and pointing them to different locations.
Want a cover? No problem. By default simply placing a cover.jpg file in that directory will produce a book cover. You can also change what this file is with config values in book.json.
Once you've written a bunch and want to convert your book into a pdf or epub file, gitbook has you covered there too (though you do need calibre installed to do it properly).
All in all, it makes my life easier since it takes away the pain of having to deal with a full-fledged Word Processor which may or may not generate things in a consistent manner.
For my workflow, I use Atom to write the book and then make use of the gitbook serve command in order to preview changes to my book as I'm writing. It's a workflow that works really well for me.
However, GitBook also provides a really slick editor that hooks nicely into their gitbook.com service (the publishing platform). It does the same kinds of things that I do in Atom, but also provides a WYSIWYG editor side pane (which Atom can also do), and a lot of nice features for speeding up editing if you don't want to just type the Markdown.
I've not done this yet, but the whole process seems pretty reasonable. If you choose to charge for your book, you receive 80% royalties. There's also a mechanism for taking donations, however I'm not 100% sure how that works.
I'm happy to also be acquainted with the creator of Remarq, a Markdown-based report generation tool. It generates beautiful PDF reports from your Markdown content and then templates it for you based upon some configuration settings which you can generate. Basically it allows you to create super-slick looking reports without having to futz with trying to make them look pretty.
Great if you're very focused on the content of a report and want to still create something visually appealing to the report's intended audience.
I don't personally use this for anything at the moment, but it's awesome and helps push my "Markdown for everything" agenda.
Just give Markdown a shot, there are tons of editors you can play with and get previews on, and the syntax is super easy to use. Commonmark provides a basic spec and introduction, and Github has a nice Markdown Basics page which should help a lot.
I recently got the bug to try something new and run my site using a static site generator instead of Drupal.
There are several reasons:
I wasn't really using any of the features of Drupal, and having a static site committed somewhere made more sense.
I've been writing more and more JS things, and since PHP is my day job I thought it'd be nice to have something else.
Metalsmith had been brought up before, as had Hexo and a couple of others (there are a few php ones as well, along with Jekyll for ruby).
The computer I was working on had npm installed but not php (it was windows, and I didn't want to type choco install php)
I ultimately went with metalsmith because it looked cool, and the idea of its render pipeline. There are also a bunch of plugins and the plugin api is pretty easy to understand once you've got it figured out.
Couple of problems I ran into:
The render pipeline takes a bit of trial and error in order to get right.
Plugin documentation doesn't always include examples.
Sometimes the generator creates some weirdness with regards to the template plugin (header repeated, double titles, etc.).
I've also switched the SSL certificate to use a beta cert from Let's Encrypt. It was fairly easy to get going (there's an automated installer to generate and pull down the cert) and it seems to be working just fine. It's a pretty cool initiative which I hope eventually gets everything behind SSL.
So! I've not actually posted about this, but I've launched a small iOS app GW2 Assistant.
Since then, we've had some issues with the local cache never clearing and the app not updating data. Because of those issues and the fact that Ionic 3 is hitting beta shelves, I'm in the process of completely rewriting the whole thing. This time, we're using redux to pass information around and persist - and leveraging some of the new quirks of Ionic 3 to hopefully tamp down on some of the issues.
I've been super busy doing stuff that isn't working on my personal site that I've not had any time to update it whatsoever. But since it's the holiday season and I have some time, I figured I'd rewrite it in Eleventy. Turns out it was super easy to convert from Metalsmith to Eleventy, thanks to the static blog starter. It did a huge amount of the work for me.
Over the next...whenever I can make time for it.... I'll be updating the styles to not look like the site was made by someone who has zero eye for design (it me!).
Also! The site is now deployed on Netlify, which was super easy to set up. Like, 2 commands and it's running easy. Even integrates with my private gitlab instance. So good.
I ran across something while working on updating Stencil tests to use puppeteer, and figured I'd put it down to paper while I'm thinking about it.
In order to run puppeteer tests, a browser needs to be present. Now, you could probably install headless chrome in the linux subsystem (and also install a window manager because evidently puppeteer needs that in order to do some of the tests) - but that seemed a little dirty. When I was running with karma I simply set the $CHROME_BIN environment variable to point at '/mnt/c/Program Files (x86)/Google/Chrome/Application/chrome.exe' - so that Karma will use the browser already installed on the Windows side of things. That interop works fine, so I figured I should go ahead and get that working in Stencil / puppeteer.
The config is relatively straightforward, but I did have to go digging in the source to figure out exactly what params to set.
Turns out it's just 2 things that need to be added to stencil.config.js:
That'll spawn a new window (the headless false part, running it in headless mode just timed out) - but retain the sandbox. Otherwise the tests run just fine.
The other day, a friend asked me a complicated question wrapped in what seems like a simple question: “How long would it take to make some simple mini-games that you could slap on a web page?”
My answer, as many seasoned developers will be familiar with (and of course it’s coming out of the architect’s mouth) was “It depends on the game and the developer. I could probably churn out something pretty good in a few days, but it’d take someone more junior longer”.
This set off the part of my brain that really wants to test out just how fast I could do a simple game in engines that I’m not familiar with. Thus, I decided to ignore my other responsibilities and do that instead! Mostly kidding about the responsibilities thing, I’m ahead of my writing goals for Nix Noctis, so I had a couple of hours to spare (and a free evening).
How long would it take to make a simple “Simon” game in GDevelop: a “no code” game engine? I wanted to start with GDevelop for a few reasons:
I wanted to simulate the experience someone with little coding experience would encounter. Knowing that I’ve internalized some concepts that would make the experience easier (or, in some cases, harder) for me.
You can run the editor in a web browser, and that’s bonkers.
I want to “pretend” to be a beginner; only use basic and easily searchable features.
I mean, I am a beginner at game dev, but I do understand several the concepts.
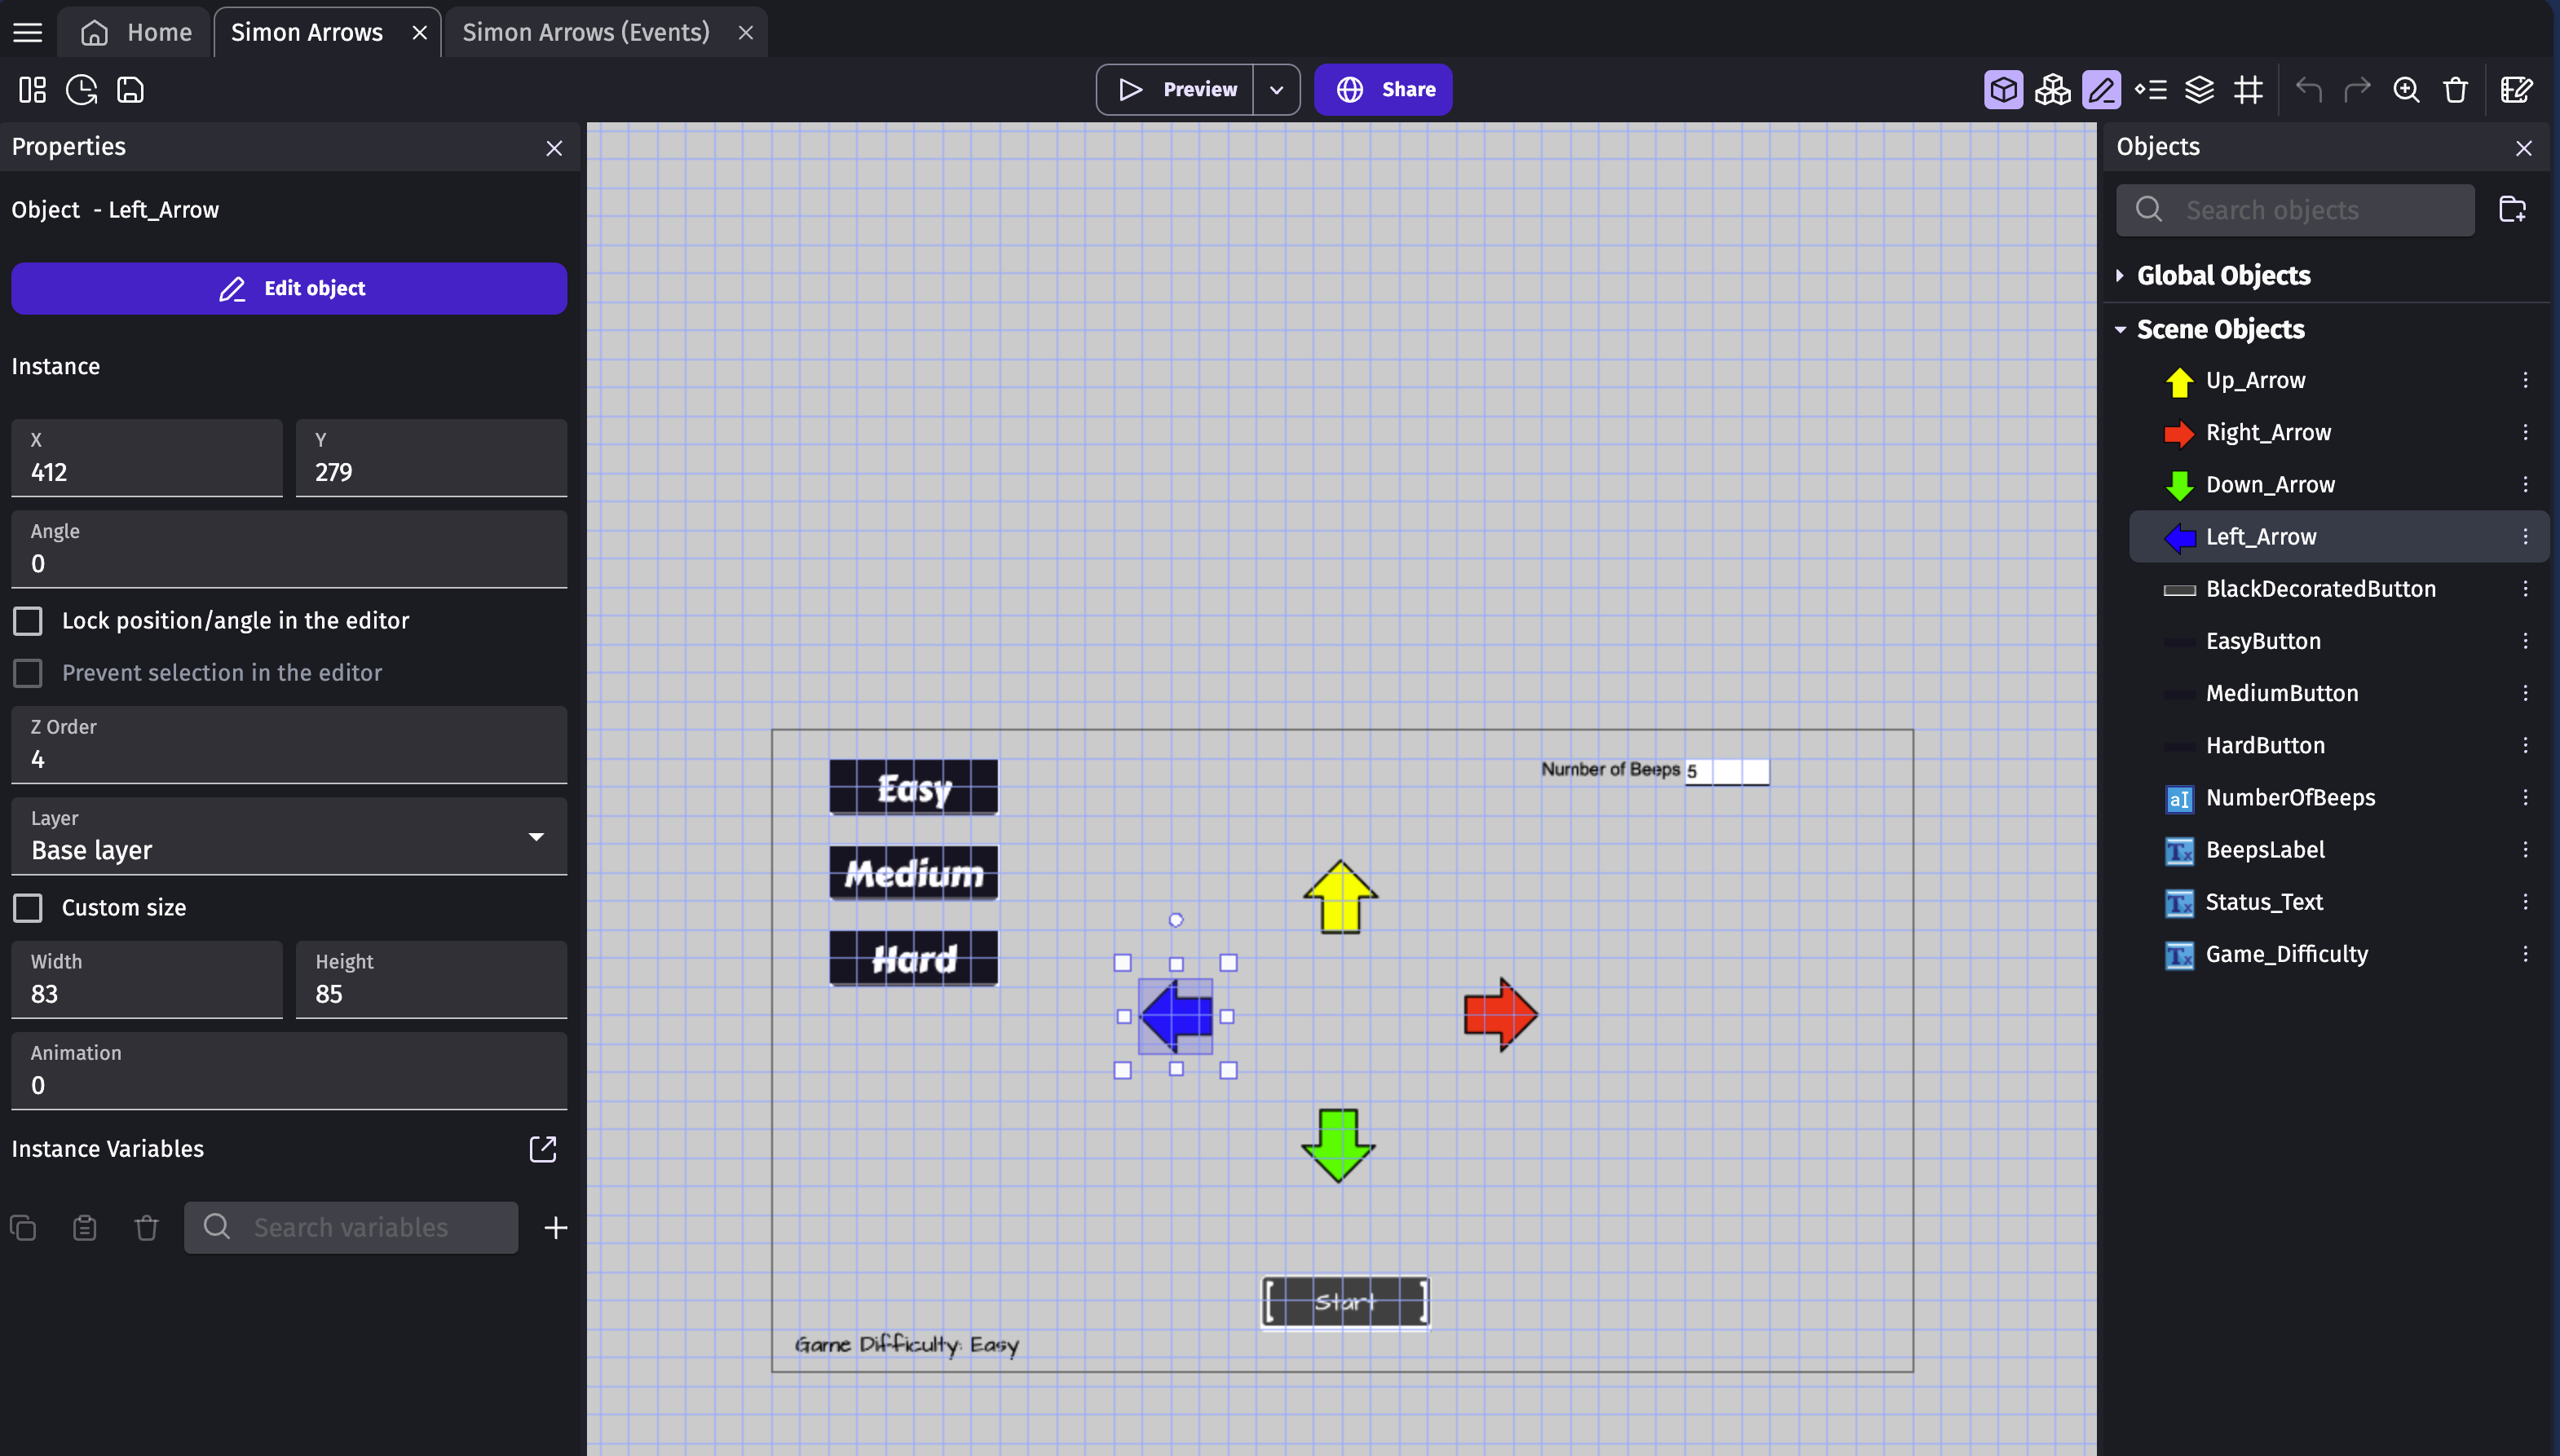
With those things in mind, I set out to remake Simon. Here were my design constraints:
Four Arrows, controllable by clicking them or via the keyboard.
Configurable number of “beeps” in the sequence
The game would not increase by one each time (though it easily could)
Three Difficulty levels which control the speed that the sequence is shown
REMEMBER! I’m a beginner at GDevelop. You’re likely going to see something and say “hey that’s dumb, you should have done it another way”. Yes. Exactly.
The editor experience in GDevelop is actually really nice, especially when you can just get into it via clicking into a browser. I found adding elements to the page very intuitive. Sprites are simple, and adding animation states to them is effortless. Creating the overall UI took me probably 20 to 30 minutes to iteratively build out a structure I was happy with, it was fast. Another fun thing I discovered was that they have [JFXR] built into the editor, and that was a delight.
What was not so quick was wiring up the game logic to the elements on the page. I’ve looked at some GDevelop tutorials before, and if you’re treading a path that’s covered by one of their “Extensions”, you’re going to have a great time. A 2D platformer will be a breeze because you can simply attach a behavior to the sprites in your game and go. There are a bunch of tutorials on making a parallax background for really cool looking level design. Simple!
What is not so simple is if you fall outside those behaviors and need to start interacting with the “no code” editor. On one hand, the no code editor is nice! The events and conditionals are intuitive if you’re approaching it in certain ways. They even let you add JS directly if you know what you’re doing (though they recommend against it). On the other hand, I can see this getting quickly messy. In my limited experience with the engine, I could not find a good way to reuse code blocks. This will come up later.
Sidebar, dear reader, I believe this is where they would say “you should make a custom behavior to control this”. I’m not sure a beginner would think to do this, but I thought about it and said, “I’ll just duplicate the blocks”.
As I worked through this process, I ran into a number of weird stumbling blocks that slowed down my progress while I tried different things.
Were I making this game in pure JS, generating the sequence would be a pretty “simple” one-liner (It’s not that simple, but hey, spread operator + map is fun! I’d expand this in a real program to be easier to understand):
// Fill a new array of size number_of_beeps with a digit between 0 and 3 to represent arrow directions let sequence =[...Array(number_of_beeps)].map(()=> Math.floor(Math.random()*4));
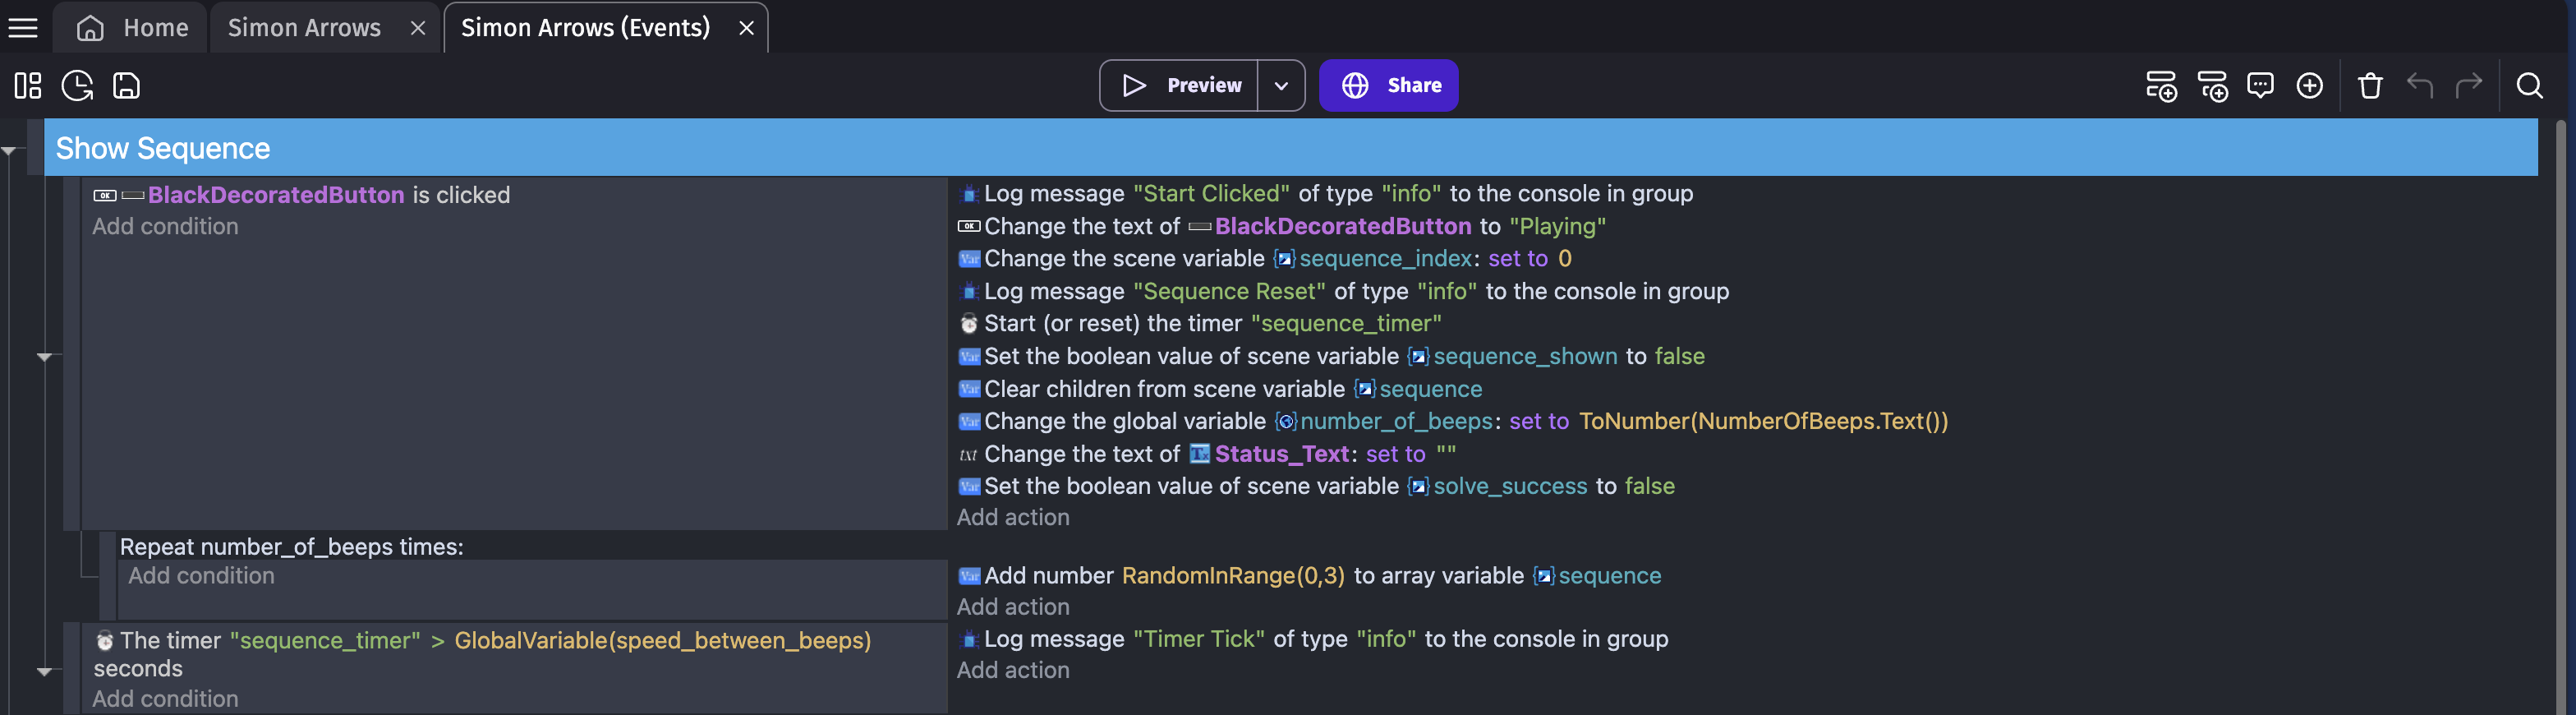
Generating the sequence was remarkably easy once I figured out how to do loops in GDevelop; they’re hidden in a right-click menu (or an interface item), but the “Repeat x Times” condition is precisely what we needed.
Likewise, doing the animation of the arrows was pretty direct. All you need to do is change the animation of the arrow, use a “wait” command, and then turn it back. Easy!
Turns out it’s not actually that easy. The engine (as near as I can tell) is using timeouts under the hood which means they’re not fully blocking execution of other tasks in sibling blocks while this is happening. Which means…
Okay, so when you’re playing Simon, the device will beep at you, light up for a non-zero number of seconds, and then dim. It should do that for each light. If you’ve never experienced this wonder of my childhood, watch this explanatory video from a random store:
Now that we know how that works, we want to emulate that in GDevelop. The first thing I tried was to simply put the “Wait” block at the end of a For...In Loop. Yeah, remember what I said about timeouts? Those don’t block. The loop would just continue and totally ignore the wait. I think that’s a major pitfall for new devs, they’re not going to understand the nuance of how those wait commands function under the hood.
The second thing I tried is the “Repeat Every X Seconds” extension to do the same thing. I couldn’t get it to even fire, and I still don’t know why.
Anyhow, I settled on using a timer to do the dirty work. Here’s how our “Play the sequence loop” wound up looking at the end:
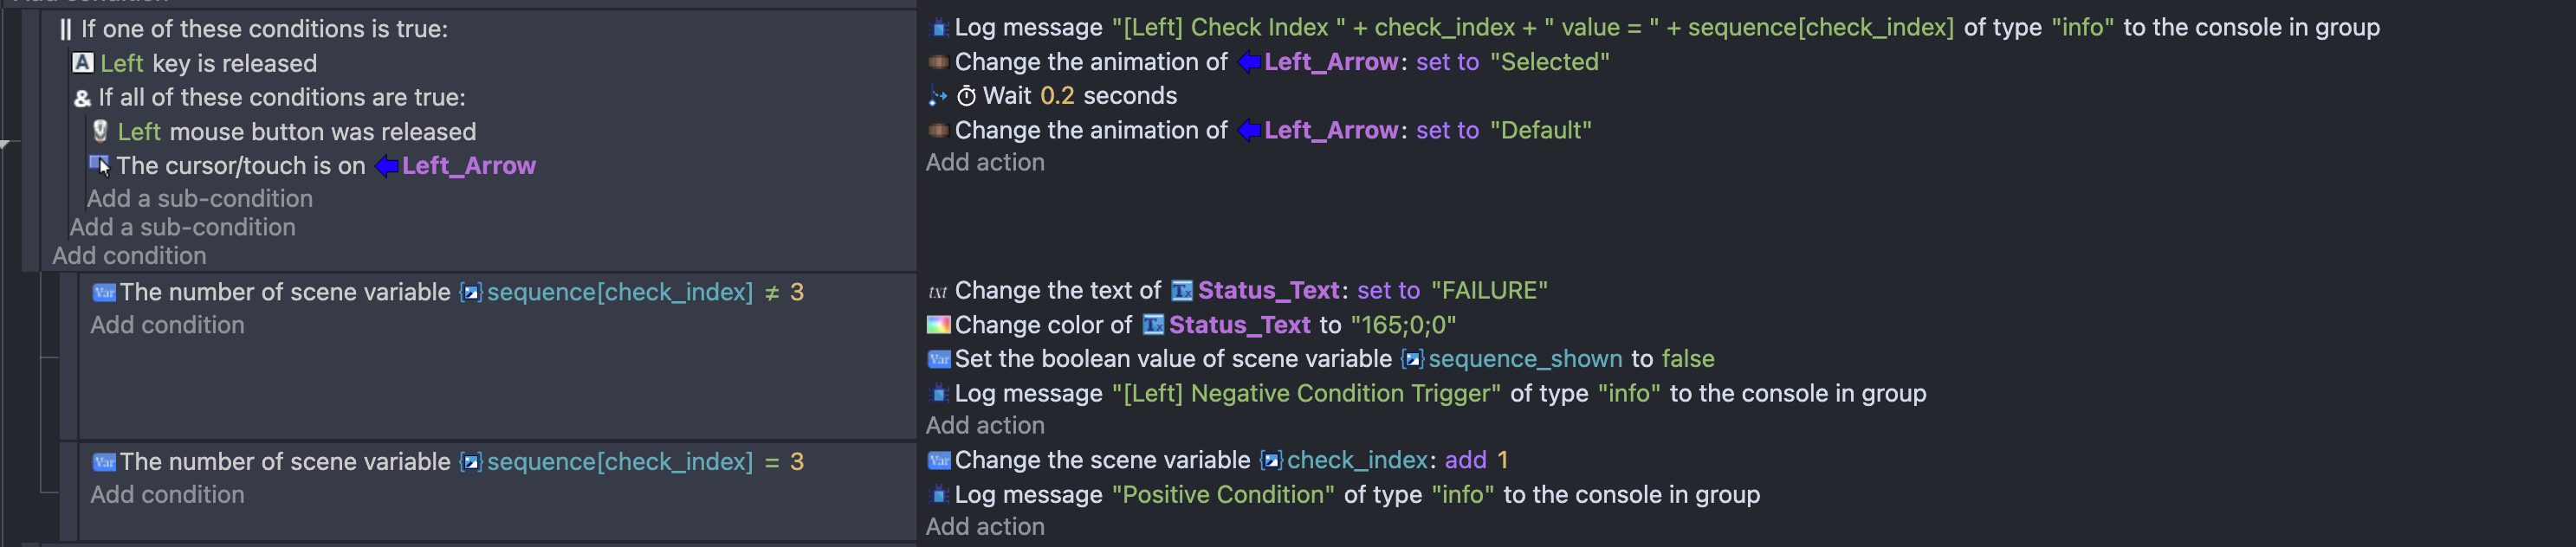
Conditionals / Keyboard Input Combined with Mouse Clicks
There’s another thing I could not figure out. I wanted to have both mouse clicks and keyboard input control the “guess” portion of the code, so I sensibly (imo) attempted to combine those into a single conditional. That wound up being…very weird, and there’s still a bug related to it.
First off, there are AND and OR conditionals. It took me a bit to find them, but they do exist. So, with a single OR conditional and a nested AND conditional, I set out with this:
This mostly works. However, for whatever reason, if you use the keyboard to input your guess, the arrow animation does not play. I do not know why. It works if you click. I can prove the conditional triggers in either case. It’s just that the animation does. Not. Work. Maybe one day I’ll figure it out, but I chose not to.
Struggling past some of those hurdles, it took me about 5 hours to meet my original design goals in GDevelop. Not terrible for not knowing anything about GDevelop besides that it exists.
After I’d done the initial experiment, I was curious if I could work faster in a game engine that has real scripting support.
The short answer is “yes”. It took me about 2.5 hours to complete the same task in Godot (with some visual discrepancies). I think the primary speed gain was from the fact that the actual game logic was much more intuitive to me and the ability to wire up “signals” from one element to the main script code made it much faster to do some of the tasks I was fighting in GDevelop.
Godot also has an await keyword which blocks execution like you’d expect it to, which is outstanding.
I did run into one major issue that I had to do a fair amount of research to solve:
AnimatedSprite2D “click” tracking is surprisingly difficult
The only issue I had was that when I needed to determine if the user had clicked on an arrow, I had to jump through some interesting hoops to detect if the mouse was over the arrow’s bounding box.
While regular sprites have a helper function get_rect() which allow you to figure out its Rect2D dimensions, AnimatedSprite2Dvery much do not (you have to first dig into the animations property, and then grab the frame it’s currently on, and then you have to get its coordinates and make your ownRect2D. Gosh, I’d have loved a helper function there).
I think the expectation is you’d have a KinematicBody2D wrapping the element, but as the arrows are essentially UI, that didn’t make any sense to me. I’ll need to dig a bit further into how Godot expects you to build a UI to do all of that, but hey, I got it working relatively quickly.
Changing the text of everything in the scene was really bizarre due to how it’s abstracted via a “Theme” object that you attach to all the UI elements? Still haven’t quite figured that out. It was really easy in GDevelop. Not so much in Godot.
Yeah, so, I liked working in Godot more because it was easier to make the behaviors work, and I was getting exhausted at the clunkiness of the visual editor. Here’s the final product:
For me, working in both of these engines for fun was a positive experience and I can see myself using GDevelop for some quick prototyping, but personally, I like Godot’s approach to the actual scripting portions of the engine. Because I have a lot of software development experience, it’s much easier for me to just write a few lines of code over having to navigate the quirks of the interface.
I think GDevelop is perfectly serviceable, though. It looks like everything in the engine does have a JS equivalent, so you really could just write JS if you wanted to. If they exposed that more cleanly, I think it’d be pretty great for many 2D needs.
But I’m not a game dev, this is just me tinkering around and giving some impressions. Go try them out for yourself, they’re both easy to get started with!